


.jpeg)
Building the roof - Archicad - Drawing plans - Inverted warm deck with green roof and skylights
- Ellie Ansell
- Jan 15, 2022
- 4 min read
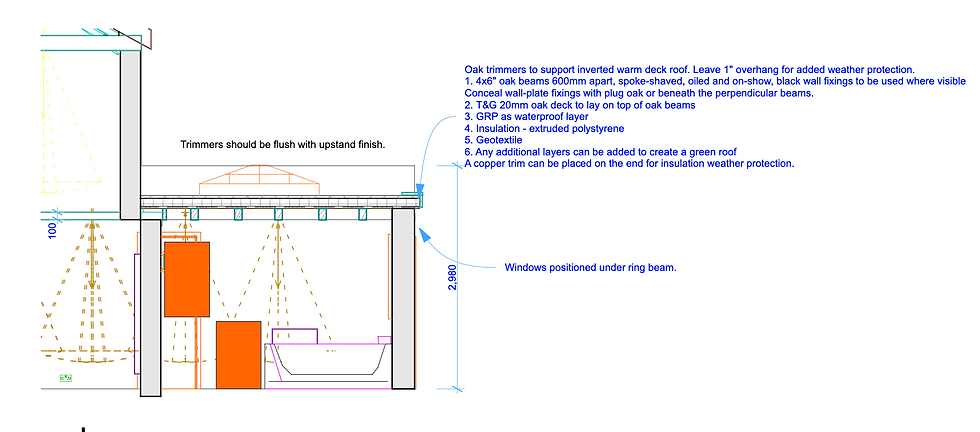
Inverted warm decks are different to typical flat roofs as they have the insulation above the weatherproofing layer, which is usually a liquid-applied membrane (GRP).
Why do this?
- Insulation provides protection to the membrane (GRP) from weather fluctuations and UV damage
- It also protects from foot traffic (not that we'll be walking on it all the time, though...)
- By moving insulation outside, we gain 5 inches of height between the joists
- Joists can look aesthetically pleasing by being on-show (we used danish-oiled oak)
The layers were comprised of:
1. Joists/trimmer arrangement: 5" oak joists, with cross and half-lap cuts to join them together, approx. 530mm O.C. (on centre).
'Deck' comprised of plasterboard and OSB:
2. Plasterboard, moisture-resistant, 12.5mm as the bottom layer of the 'deck' on top of the joists
3. OSB, 20mm, the second layer of the 'deck' laid on top of plasterboard. 60mm screws were drilled through the OSB, plasterboard and into the joists along the deck seams.
4. GRP (Glass Reinforced Plastic), a.k.a. fibreglass, weatherproof membrane
5. XPS, 100mm thick (looks light blue in photos), extruded polystyrene, 'floating' on top of the GRP.
6. Green roof layers comprised of:
- Drainage mat - a plastic waffle layer, which retains some water in the waffle 'cups'
- Fibre fleece (thin porous fabric layer made from polyester fibres) covering the waffled layer
- 50mm substrate layer, evenly spread on top
- Green beautiful sedum is rolled out on top of the substrate
Why do a green roof?
- It looks fantastic!
- Some sound protection
- Added insulation
- Ready-rolled insect city
- Additional protection to weatherproof layer prolongs its life
- Attracts CG references (pigeons, cats...)
Why did we use GRP?
- This is easier to seal than EDPM around fiddly skylight up-stands
- Mixing the correct ratio of catalyst to resin was straightforward, and fast to set, with plenty of good tutorials online and kits available (we bought a 15m^2 kit)
Why were the joists 4"x5" Oak joists?
- Oak looks fantastic!
- It's durable hardwood, grown over many years and deserves to be on-show
- We gained head height; previously the joists were 2"x6" rough-sawn timbers concealed by plasterboard, so by replacing with 5" height joists, this added an inch of head-height.
- Being wider added structural support, and more fancy oak to gawp at.
Why didn't you hire someone to do the works?
- Frustratingly, I tried, and wasted months doing so. I contacted 50+ builders (yes, you read that right) since Jan 2021, many visited and said they'd email a quote EOW, but didn't, so a lot of time was wasted simply waiting. One builder said honestly, "You're a young unmarried couple; people assume you can't afford it", "they want old clients who they can charge more to", as well as, "there's better work elsewhere", "parking is too awkward on this road", "the job is too small". With each failed contact, I revised, spoke to my dad, re-drew and re-wrote the specification until I understood exactly what had to be done and could break it down into smaller chunks.
Story time: When we eventually got a single quote (£13k for the ground floor plans), it was £7k to replace the 3.5m^2 roof for 2 weeks work, excluding the green roof and with us supplying the skylight (£1k). By doing it ourselves, oak turned out to be £1k (not 2.4); GRP, trims, plasterboard, OSB, plaster materials were ~£800. A week before works were due, we found holes in his '12yrs-in-business company' which was created a week beforehand, and he emailed asking for £4k payments upfront, £4k after the second day etc... this was too fishy, he also phoned me saying ,"I need the money now to get you the best deal from the supplier... no I can't give you receipts" -- we bailed!
However, we did have successes in hiring people for the following:
- Replacing a single radiator
- A plumber to redirect the water mains
- A builder to supply and replace the windows and door
- Tiling most of the kitchen floor (we finished off the last 4 tiles, and he did leave some wobbly tiles...)
- Electrician for ring main, fuses, hob/oven, sockets, spotlights, extractor fan
Below are screengrabs of the building plans I'd made using Archicad, which I'm super proud of, as we fooled so many builders into thinking we hired an architect!

The back windows/door sizes differ from reality, as it was faster, cheaper and easier to have more window and not rebuild the wall (I think it looks better, too). The deck is plasterboard+OSB, not oak boards, to save cost, and I believe it was easier to fit. In the kitchen, we made some changes to the electrics, too.
As a last minute (2 weeks beforehand) change, I decided to order a tiny 0.6m^2 flat toughened glass window to go into the bathroom between the joists. It was worth it!

The 3D views were useful to see and plan. This was a really nice perk of Archicad, although I found assigning materials very fiddly, and certain BIM objects weren't flexible.
Anyway... here's the end result view from the office window! <3


Hard work pays off - if you want something done, do it yourself (sensibly!) - roll up your sleeves and dig in!

Comments